Showing posts with label DIY. Show all posts

Thursday, May 17, 2018

DIY Neon Pumps


You need (Necesitas): 
  • A pair of shoes / Par de zapatos
  • Sand paper / papel pulidor
  • Acrylic paints / Pintura acrilica
  • Pain brushes / Pinceles
  • Masking tape / Cinta adhesiva
  • Wax paper (you can mix the paints on it) / Use papel wax para mesclar la pintura, puedes usar un platito tambien.
  • A knife (not sharp. use it to mix paints) / Un cuchillo que no sea filudo ya que es para mesclar la pintura.
  • A bowl with water / Un recipiente con agua para lavar los pinceles cada vez que los uses.

ps: got art supplies for my art classes.


Step 1 /Paso 1
Scuffing
Use sand paper to make a rough surface so that the paint will stick better. / Usa papel pulidor para pulir la superficie de los zapatos. De esta manera la pintura se adherira mejor. 


 Step 2/Paso 2
White Paint/Pintura Blanca
Apply white paint as the first coat all over. Try to do straight strokes perpendicular to the base of the shoe. (I wanted white heels so I applied two more coats of white paint)Let it dry for a few hours. Clean the brush on the bowl with water. Use a paper towel to dry the brush.
Aplica una primera mano de pintura blanca en todo el zapato. Trata de aplicar la pintura de arriba para abajo (desde arriba del zapato hasta la base). En la foto se puede apreciar la aplicacion. Deja que se seque. Limpia los pinceles en el deposito con agua y usa papel de cocina o toallita para secar. Esto es para siempre tener pinceles libre de residuos asi no se producen cúmulos.


Step 3/Paso 3
Tape & Mix Color / Cinta Adhesiva & Mescla Pintura
Tape the parts of the shoe that you want in a different color. Make sure to press hard on the edges of the tape but if some paint goes underneath don't worry because you can always wipe it off or paint on top. I added a little bit of green to the yellow besides white and I mixed the paints on the wax paper.
Usa la cinta adhesiva y cubre las partes que no deseas pintar. Asegurate de no dejar espacios descubiertos. Agregue un poquito de pintura verde y blanco a mi mescla. Como podras ver en la foto aqui abajo. Si llegas a pasar pintura donde no quisiste, no te preocupes porque puedes limpiarlo con un trapito humedo o tambien puedes dejarlo secar y pintar encima.
Step 4/ Paso 4
Coats of Color/Manos de Color
Apply first coat and let it dry for a few hours. I added a little bit of water to the paint so it won't be that thick on the shoes leaving marks. If you see tick marks of paint, pass over it with a damp clean brush to obtain a smooth surface.
Aplica la primera mano de pintura. Yo agregue un poquito de agua a mi pintura para deluirla un poquito. De esa manera no dejar marcas gruesas en la superficie. Si llegas a tener marcas, con el pincel humedo y limpio, pasalo sobre la superficie para suavisar esas marcas.


Apply second coat/layer of paint and let it dry. Aplica una segunda mano de pintura y dejalo secar (te llevara unas horitas que se seque bien)

I especially wanted to apply 3 coats of paint in order to have a rich color. I let them dry over night. Yo aplique como 3 manos de pintura para asi tener un color rico. Y lo deje secar por una noche.

Step 5/Paso 5
Red Paint./Pintura Roja
Follow the same rules as before. Coats of paint and letting them dry between each coat. I used the round tip brush so I could reach in the hardest part of the heel.
Sigue las mismas instrucciones de antes. Aplica la pintura y dejalo que se seque despues de cada pasada. Yo use un pincel redondo para poder pintar el area que ves en la fotito. 

Step 6/Paso 6
Corrections/Correcciones
If you have to make corrections, now's the time to do it. I apply more white paint on the side to make an even straight line. Let the shoes dry overnight.
Si tienes que hacer correcciones, ahora es el tiempo de hacerlo. Yo aplique mas pintura blanca al costado de la suela en una forma uniforme y derecha. Dejalos que se sequen bien. 


Step 7/Paso 7
Sealer/Sellar
Use the Clear Acrylic Sealer. Go outside to spray it on the shoes. First, I sprayed it all over the shoes and after they were dry I sprayed it on the heels. I left the bottoms for the end. Follow the instructions that the Sealer provides.
Yo use sellador para pintura acrilica. Para aplicar esto, es preferible hacerlo al aire libre. Primero, lo rosee sobre la superficie, lo deje secar y despues lo rosee sobre los tacos. Despues rosee en las suelas y deje secar. No te olvides de leer las instrucciones que el sellador tiene.


PS: An important tip I forgot to add on this post is that it's good to use an acrylic paint sealer as a final touch. You can use the "Krylon 1305 Uv-Resistant" and let it dry.
------------------------------------------
PD: Una cosita que me olvide de compartir es que hay que sellar la pintura con un spray para pinturas acrilicas, como el "Krylon 1305 Uv-Resistant". Dejalo secar y listo


And Voila !!!
Y Voila !!!


I hope you like my first DIY ;) !
Espero que les guste mi primer 'Hazlo Tu  Misma"

Thank you so much for reading,
Muchas gracias por leer.
XO !
Elsey

Friday, March 6, 2015

Playing with Textures: Gold and Green Nails


My love for textured nail polish started when I was doing jewelry craft. You tend to damage your nails a lot when working with the tools and chemicals, and I noticed that they endured better when I used these types of nail polish. Even though I'm on hiatus from the jewelry making, I still enjoy playing with textures on my nails.
___________________

Mi amor por esmalte de uñas con textura empezo cuando hacia joyas de metal. Las uñas siempre se deterioran al trabajar con herramientas y quimicos, pero despues de usar este tipo de esmaltes note que las protegia mas. Y ahora aunque me tome un descanso de trabajar con mis manos (problemas de ligamento-dedo), sigo usando texturas en mis uñas. Me gusta :) 

  1. First I apply a base coat (which I forgot to take a picture of). Primero puse un esmalte de base protector (me olvide de tomar foto).
  2. Then I apply the color coat, (in this case the green), usually about 3 coats. Aplique el color verde como tres capas.
  3. And finally I apply the matte texture (also on the gold). Y al final aplique el esmalte mate. Me encanta ya que torna cualquier color en mate :)

Usually these colors would be very shimmery and reflective but the matte only lets a little through, which gives it an interesting effect. Estos timpos de esmaltes son bien brillosos, pero el mate hace que el brillo solo se vean un poquito lo cual lo hace ver mas interesante y atractivo.

(Verde) Green: Maybelline New York Color Show Holographic "Mystic Green 25".
(Dorado) Gold: Essie "Rock at the Top".
(Mate) Matte: Nicole by OPI "Matte Top Coat".

See you on Facebook & Instagram
Kisses!
______________

Nos vemos en Facebook & Instagram
Besos!


Here are some other times I had texture nails (sorry the last pics are not that great)
Aqui hay algunas fotitos de cuando use esmalte con textura (lo siento que las ultimas fotos no estan tan bien)


Thursday, April 24, 2014

Bringing Some Sunshine.

Hello everyone ! I'm bringing some sunshine to this grey day. I wore this happy looking outfit last Friday to go out with my handsome husband and some friends. I hope you like this idea :D ! Have a great day everyone and thank you for your support.

Spanish/ Español
Hola a todos! Les traigo un poquito de sol en este dia gris. Vesti este look el Viernes que paso para salir con mi amado esposo y un par de amigos. Espero les guste esta idea :D ! Que tengan una gran dia y muchas gracias por su apoyo.


I Wore (Vesti)

  • Tank top (old)
  • Blazer by Chadwicks via MJRSales . It was $49.00 I paid $15.99 
  • Jeans by Marshalls $9.99 (2011)
  • Bag (carterita) Nude Quilted Lock Across Body Bag
  • Heels (tacos): DIY Steps how to make them here (instrucciones de como pintarlos aqui )
  • Necklace (collar): Nicole Miller (gift)
  • Lipstick (lapiz de labios): Gabriel " Tea Rose" via Wholefoods Market. (lo compre en el mercado de Wholefoods).

Thank you for reading!
hugs!
Elsey

Muchas gracias por leer!
abrazos!
Elsey

Friday, February 14, 2014

Burberry Hearts: DIY Valentine's Day Inspired Nails


 Happy Valentine's Day everyone!
Today's Inspiration is the hearts of Burberry Collection Fall-Winter 2013. Have a great day.
____________________

Feliz dia del Amor y la Amistad!
La inspiracion del dia es los corazones de la Coleccion de Burberry de Otoño-Invierno 2013. Que tengas un hermoso dia.


Burberry Collection 

Supplies: Nail Polish, toothpick, hair clips and plastic top.
________________

Se Necesita: Esmalte de uñas, palitos de dientes, ganchitos de perlo y tapa de plastico.

Don't worry about the mess, we'll clean everything up at the end
__________________

No te preocupes del color en los dedos, se limpiara al final.

Place small amount of nail polish on the plastic top (It's better if the dots are very small, and you'll know why in the next step) Use a tooth pick to start with two dots (Use what it's easier for you)
_________________

Agrega un poco de esmalte en la tapa de plastico. Usa un palito de dientes para empezar con dos puntitos (Usa lo que es mas facil para ti). 
Es preferible que los puntitos sean pequeños y sabras porque en el siguiente paso.


Now drag a line in a V shape. (I had to do re-do this part starting with smaller dots since the heart I ended up with was too big for my taste).
____________________

Ahora agrega una linea y forma una V y despues rellena. (Tuve que re-hacerlo ya que termine con un corazon grande).

And Voilà !
The hearts are smaller since I re-did the process starting with smaller dots
______________

Y Listo !

Termine con corazon mas pequeños ya que hice el proceso otra vez, empezando con pequeñitos puntos.


See you on Facebook
______________

Nos vemos en Facebook


Monday, October 28, 2013

Black & White:: Outfit Idea III : DIY Studded Vest & 3.1 Phillip Lim for Target Tote with Gusset


"Monday Morning Time: a cup of hot hello, a plate of crispy wishes, a spoon of sweet smiles and a slice of great success specially for you! Enjoy the day !!! "
___________

"Lunes por la mañana: Una taza caliente de holas, un plato de crujientes deseos, una cucharada de dulces sonrisas y una rodaja de grandes exitos especialmente para ti! Disfruta tu dia !!! "


Hi dolls! 
Today, I'm sharing a casual black and white outfit idea. The feature of today's look is this white DIY vest I made. Click here to see the steps :) I like to wear casual and comfortable outfits plus wearing flats is good for my back. I hope you like this. Have a great week :)
Black & White Outfit Idea I & II here and here
________________

Hola bellas! 
Hoy, estoy compartiendo un atuendo casual blanco y negro. Y la estrella de hoy es este chalequito blanco que es una Manualidad que hice. Abre este link para ver los pasos :) Me gusta vestir atuendos casuales y comodos y tambien caminar en chatitas viene bien para mi espalda. Espero te guste esta idea. Que tengas una gran semana :) 
Atuendos Negro & Blanco I & II aqui y aqui 

______


I loved pairing these two pieces. First of all, I was so happy when I got this 3.1 Phillip Lim for Target Bag.  Luck was looking out for me and I was at a target that had misplaced their inventory and so were just opening the handbag boxes when I got there (just before closing time.) It was so funny when I asked if they had this one to which the seller representatives answered that all of the boxes of bag are mine to check out lol. I had a smile that I call "a happy birthday smile" lol
Shoes: I really like these elegant pointed ballet flats and the contrasting heel. They are very comfortable once you break them in. Since they are leather they will stretch to your foot shape.
________________

Me encanto mesclar estas dos piezas. Primero que nada, estaba tan feliz cuando consegui esta cartera de 3.1 Phillip Lim for Target. El destino estuvo de mi lado. Estuve en un Target que habia extraviado el inventario y cuando llegue recien las habian encontrado (justo antes de cerrar la tienda). Fue tan gracioso cuando pregunte si tenian esta cartera a lo cual los trabajadores respondieron amablemente que las cajas de carteras eran mias para buscar las que quiera jajaja.. Tuve una sonrisa a la que suelo llamar "Sonrisa de Feliz Cumple" jajaja..
Zapatos: De verdad me encantan estas ballerinas y el contraste del taco. Son bien comodas ni bien las uses y se hagan a la forma de tu pie ya que son de cuero.


Outfit :: Atuendo

Top: Asos, old (viejito)
Vest (chaleco): DIY (Manualidad)
Jeans (vaqueros): Forever 21, 2012
Bag (bolso): 3.1 Phillip Lim for Target Tote with Gusset 
Necklace (collar): Tiffany & Co Interlocking Circles Pendant (gift by my husband) 
Shoes (zapatos): Aldo "Hirena" , got it on May (compre en Mayo). They are on sale now (en oferta ahora)

See you on Facebook
______________

Nos vemos en Facebook


Saturday, October 19, 2013

DIY Studded Vest - Manualidad Chaleco con Tachuelas


" To live a creative life, we must lose our fear of being wrong."

" Para vivir una vida creativa, debemos perder nuestro miedo de estar equivocados."
~ Joseph Chilton Pearce

Hi dolls, how are you? I hope you are enjoying your weekend. Days here have been nice, not cold enough to wear big coats or jackets jet. I had in mind to make a vest and here is one of them ;) I hope you like this DIY.

Hola bella, como has estado? Espero estes disfrutando de tu fin de semana. Por aqui, todabia no hace mucho frio como para vestir grandes abrigos, pero si como para vestir lindos chalecos ;) Espero te guste esta manualidad "Hazlo Tu Misma".


You'll need :: Necesitaras
  1. A Jacket. Una Chaqueta
  2. Studs (got it from Michael's). Tachuelitas (las compre de Michael's)
  3. Scissors. Tijeras
  4. Needle. Aguja
  5. Thread. Hilo
  6. Pins. Alfileres
  7. Shoulder pad (optional). Hombreras (opcional)
  8. A fabric pencil (something to mark). Un lapiz de tela o algo para marcar
  9. A dart or ice pick. Un dardo o Picahielo (algo filudo)

This is the Before (I decided to re-purpose this jacket since the arms were too tight - it was not flattering anymore) 

Esto es el Antes (decidi re-inventar esta chaquetita ya que las mangas me quedaban un poco apretaditas - ya  no me quedaba muy lindo)


1. Use pins to affix the front of the sleeve to the back so it doesn't move around while cutting the sleeves off.

Usa los alfileres para fijar la parte delantera de la manga y la parte de atraz asi la tela no se mueve cuando llegue el tiempo de cortar las mangas.


2. Cut just over an inch away from the sleeve line. (Through experience I've found that leaving to little makes it difficult to secure it with sewing when you fold it in later on)

Al cortar la manga, es mejor cortar mas de una pulgada de tela (es mejor tener mas tela para doblar que poquita). Con experiencia he notado que dejando poquita tela hace mas dificil para coser cuando llegue el tiempo de coser.


3. Match the grooves of the threading with the legs of the studs where you plan to place them on the shoulders. (I placed the shoulder studs first because we will cover the backings/legs with shoulder padding.)

Coloca las tachuelas a lo largo de el tejido de la tela. Basado en mi diseño, las coloque en la parte de los hombros. (Coloque las tachuelas primero ya que despues agregaria las hombreras - paso 4)


This how it looks once I finished putting in the shoulder studs.

Asi es como se ve despues de agregarlas en los hombros.


4. Here is what it looks like inside, with the stud legs folded back. I used pins and then single stitches to secure the shoulder pad over the legs. The purpose of using shoulder pads is not only to cover the legs of the studs, but also to add more volume, more body to the shoulders since this is a cotton vest.

Asi es como se ve al revés con las patitas dobladas. Use alfileres para poner las hombreras y despues un par de cosidas para asegurar. El propósito de las hombreras es para cubrir las patitas de las tachuelas y para dar mas cuerpo a los hombros ya que este chaleco es de algodón.


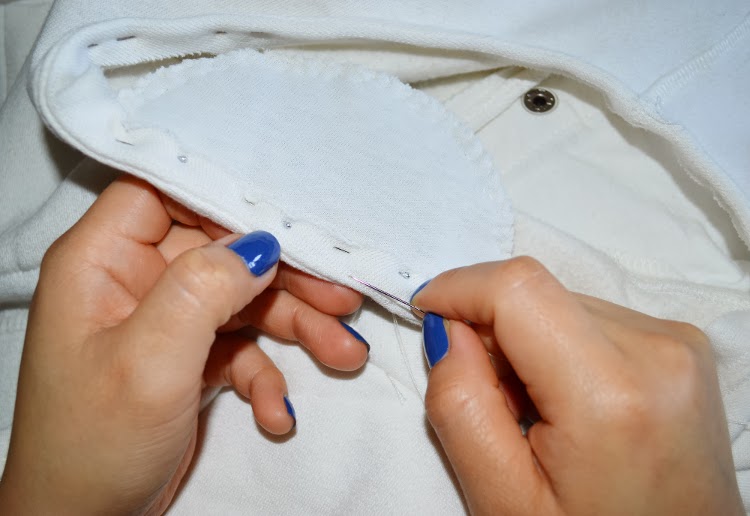
5. Fold the extra fabric from the sleeves inside and use pins to secure it.

A doblar la extra tela, usa los alfileres para asegurar.


6. Once you have it secured with pins, you can begin the stitching to secure it. (I did it by hand since I don't have  a  sewing machine)

Despues de tenerlo asegurado con los alfileres, empieza a coser. (Yo lo cosi a  mano ya que no tengo una máquina de coser -todabia ;) )


7. Use a fabric pencil to mark the holes for the stud design you will use.

Después de hacer la primera parte. Ahora es tiempo de seguir la segunda. Usé un lápiz de tela para marcar puntitos donde iría las tachuelas.

8. Use something sharp like a throwing dart or ice pick to make the holes for the studs. (The lapels are thicker than the shoulders so I was not able to use the studs to make the holes)

Usa algo filudo para hacer los agujeros para las tachuelas. (Las solapas son mas gruesas que la parte de los hombros, es por eso que no se pudo perforar la tela usando sólo las tachuelas)


And voilà ! Here is the final vest when I finished.

 And voilà ! Asi es como quedo el producto final. 


See you on Facebook

Nos vemos en Facebook