Showing posts with label Manualidades. Show all posts

Thursday, May 17, 2018

DIY Neon Pumps


You need (Necesitas): 
  • A pair of shoes / Par de zapatos
  • Sand paper / papel pulidor
  • Acrylic paints / Pintura acrilica
  • Pain brushes / Pinceles
  • Masking tape / Cinta adhesiva
  • Wax paper (you can mix the paints on it) / Use papel wax para mesclar la pintura, puedes usar un platito tambien.
  • A knife (not sharp. use it to mix paints) / Un cuchillo que no sea filudo ya que es para mesclar la pintura.
  • A bowl with water / Un recipiente con agua para lavar los pinceles cada vez que los uses.

ps: got art supplies for my art classes.


Step 1 /Paso 1
Scuffing
Use sand paper to make a rough surface so that the paint will stick better. / Usa papel pulidor para pulir la superficie de los zapatos. De esta manera la pintura se adherira mejor. 


 Step 2/Paso 2
White Paint/Pintura Blanca
Apply white paint as the first coat all over. Try to do straight strokes perpendicular to the base of the shoe. (I wanted white heels so I applied two more coats of white paint)Let it dry for a few hours. Clean the brush on the bowl with water. Use a paper towel to dry the brush.
Aplica una primera mano de pintura blanca en todo el zapato. Trata de aplicar la pintura de arriba para abajo (desde arriba del zapato hasta la base). En la foto se puede apreciar la aplicacion. Deja que se seque. Limpia los pinceles en el deposito con agua y usa papel de cocina o toallita para secar. Esto es para siempre tener pinceles libre de residuos asi no se producen cúmulos.


Step 3/Paso 3
Tape & Mix Color / Cinta Adhesiva & Mescla Pintura
Tape the parts of the shoe that you want in a different color. Make sure to press hard on the edges of the tape but if some paint goes underneath don't worry because you can always wipe it off or paint on top. I added a little bit of green to the yellow besides white and I mixed the paints on the wax paper.
Usa la cinta adhesiva y cubre las partes que no deseas pintar. Asegurate de no dejar espacios descubiertos. Agregue un poquito de pintura verde y blanco a mi mescla. Como podras ver en la foto aqui abajo. Si llegas a pasar pintura donde no quisiste, no te preocupes porque puedes limpiarlo con un trapito humedo o tambien puedes dejarlo secar y pintar encima.
Step 4/ Paso 4
Coats of Color/Manos de Color
Apply first coat and let it dry for a few hours. I added a little bit of water to the paint so it won't be that thick on the shoes leaving marks. If you see tick marks of paint, pass over it with a damp clean brush to obtain a smooth surface.
Aplica la primera mano de pintura. Yo agregue un poquito de agua a mi pintura para deluirla un poquito. De esa manera no dejar marcas gruesas en la superficie. Si llegas a tener marcas, con el pincel humedo y limpio, pasalo sobre la superficie para suavisar esas marcas.


Apply second coat/layer of paint and let it dry. Aplica una segunda mano de pintura y dejalo secar (te llevara unas horitas que se seque bien)

I especially wanted to apply 3 coats of paint in order to have a rich color. I let them dry over night. Yo aplique como 3 manos de pintura para asi tener un color rico. Y lo deje secar por una noche.

Step 5/Paso 5
Red Paint./Pintura Roja
Follow the same rules as before. Coats of paint and letting them dry between each coat. I used the round tip brush so I could reach in the hardest part of the heel.
Sigue las mismas instrucciones de antes. Aplica la pintura y dejalo que se seque despues de cada pasada. Yo use un pincel redondo para poder pintar el area que ves en la fotito. 

Step 6/Paso 6
Corrections/Correcciones
If you have to make corrections, now's the time to do it. I apply more white paint on the side to make an even straight line. Let the shoes dry overnight.
Si tienes que hacer correcciones, ahora es el tiempo de hacerlo. Yo aplique mas pintura blanca al costado de la suela en una forma uniforme y derecha. Dejalos que se sequen bien. 


Step 7/Paso 7
Sealer/Sellar
Use the Clear Acrylic Sealer. Go outside to spray it on the shoes. First, I sprayed it all over the shoes and after they were dry I sprayed it on the heels. I left the bottoms for the end. Follow the instructions that the Sealer provides.
Yo use sellador para pintura acrilica. Para aplicar esto, es preferible hacerlo al aire libre. Primero, lo rosee sobre la superficie, lo deje secar y despues lo rosee sobre los tacos. Despues rosee en las suelas y deje secar. No te olvides de leer las instrucciones que el sellador tiene.


PS: An important tip I forgot to add on this post is that it's good to use an acrylic paint sealer as a final touch. You can use the "Krylon 1305 Uv-Resistant" and let it dry.
------------------------------------------
PD: Una cosita que me olvide de compartir es que hay que sellar la pintura con un spray para pinturas acrilicas, como el "Krylon 1305 Uv-Resistant". Dejalo secar y listo


And Voila !!!
Y Voila !!!


I hope you like my first DIY ;) !
Espero que les guste mi primer 'Hazlo Tu  Misma"

Thank you so much for reading,
Muchas gracias por leer.
XO !
Elsey

Friday, September 6, 2013

DIY Studded Sandals :: Manualidad Sandalias Tachuelas


Hi dolls! I'm baaaack! I'm sorry for the absence. I had a great time with my husband visiting a couple of dear friends in Chicago (OOTD and pics coming soon). I did this project before I left, but I didn't have a chance to post it. I had this idea for months and I finally  got around to doing it. I only wore these sandals a couple of times since I bought them years ago.

Español
Hola muñecas! Ya volviiiii! Lo siento que estuve ausente. Mi esposito y yo fuimos de viaje a Chicago a visitar a una querida pareja de amigos. La pasamos super ! (fotitos/vestuario vienen pronto). Hice esta manualidad antes de viajar pero no tuve tiempo de subirla. Esta idea estuvo en mi cabeza ya por mucho tiempo y ahora que la hice me siento mas aliviada. Use estas sandalias solo un par de veces desde que las compre.

You'll need :: Necesitaras
  • A pair of sandals. / Un par de sandalias.
  • A pencil (to mark the hole location). / Un lapiz para marcar los puntitos.
  • Leather punch(for the big holes). / Perforadora de cuero.
  • Dart or Ice Pick (for the small holes). / Use un dardo para los huequitos pequeños.
  • Studs (rounded and square from Michaels) /  Tachuelitas (use redonditas y cuadraditas de Michaels).


Step 1: Mark the hole locations with dots.
Paso 1: Marca donde pondras las tachuelitas.


Step 2: Make the holes. I used the leather punch for the larger holes and a throwing dart for the smaller holes.
Paso 2: Hace los huequitos. Use la perforadora de cuero para los huecos grandes y el dardo para los huecos pequeños.


Step 3:  Place the studs in the holes and fold the legs back (like in the picture below). Make sure you bend them so they are flush against the leather and won't cut or scrape your feet.
Paso 3: Agrega las tachuelas y dobla las patitas (como en la foto de abajo). Asegurate que esten bien dobladas y un poco incrustadas en el cuero para que no te roce la piel.


Tip: You can also glue a small strip of fabric or leather over the folded legs of the studs as additional protection.
Consejito: Puedes agregar/pegar un pedazon de tela o cuero a lo largo de las patitas como extra proteccion.

Thank you so much for reading.
I hope you like this DIY.
kisses!

Muchas gracias por leer.
Espero que te haya gustado esta idea de manualidad, Hazlo Tu Misma.
besos!

Tuesday, July 30, 2013

Red and White Nails:: Peruvian Flag Inspired

"The army is the true nobility of our country"
~ Napoleon Bonaparte
_________________

"El ejercito es la nobleza verdadera de nuestro pais"
~ Napoleon Bonaparte


Hola a todos, Hoy quiero compartir uñas color blanco y rojo inspirada en la bandera peruana. El Domingo que paso fue el dia de la independencia de Peru, y como buena peruana, quise mostrar mi amor por mi patria vistiendo estos dos amados colores. Espero que les guste esta idea.

English
Hi everyone, Today I wanted to share a white and red nail polish idea which was inspired by the peruvian flag. Last Sunday was Peru's Independence day and as a good peruvian, I wanted to show my love for my country by wearing these hues.
Hope you like this.


Te amo Peru !
Dios te bendiga.

I love you Peru !
May God bless you.

Muchas gracias por tu visita y apoyo.
Nos vemos en facebook.
_______________

Thank you so much for reading.
See you on facebook.


Saturday, July 6, 2013

DIY Color Blocking Wedges


Hi everybody,
I thought sharing a DIY project for this weekend would be fun. Here I took some slightly bland wedges and made them a bit more fun and lively for the summer (I painted them last year). I got inspired by the Giuseppe Zanotti color-block sandals.
What you need:
  • Shoes
  • Acrylic Paint
  • Acrylic Paint Sealer. You can use "Krylon 1305 UV-Resistant"
  • Brushes
  • Wax Paper
  • Water (for rinsing brushes)
  • Masking Tape (to guard borders and cover every part that you don't want to paint or spray)

Unfortunately I didn't take pictures of the process but just the before and after (If you want, you can follow these instructions where I painted my Pumps - it's the same process). Really you can paint them any way you want, but this is how I did it. I first started with the pink, then with the yellow and the last color I added was the baby blue. .

ESPAñOL:
Hola a todos,
Pense que compartir este manualidad "Hazlo Tu Misma" para este fin de semana seria divertido. Tome estas sandalias de color no muy atractivas y las cambie completamente (las pinte el año pasado). Me inspire en las sandalias de color block de Giuseppe Zanotti.

Lo Que Nesecitas:
  • Sandalias
  • Pintura acrilica
  • Sellador de pintura acrilica. ejemplo: "Krylon 1305 UV-Resistant"
  • Pinceles
  • Papel de Cera de cocina
  • Agua (para lavar los pinceles)
  • Cinta adhesiva. (para cubrir cada parte que no quieras pintar)
Desafortunadamente no tome fotos de los pasos solo del antes y despues (si quieres puedes seguir estos pasos de cuando pinte mi zapatos negros en neon - es el mismo proceso).  O los puedes pintar en la manera que te sientas comoda. Yo por ejemplo hice asi: Primero empese con el color rosado, despues con el amarillo y por ultimo agregue el color celeste.


Don't they look better! Why don't you try it as well? Have fun ^^ !
________________________________

No se ven mas lindas! Te animas a hacer algo similar? Que te diviertas ^_^

See you on FACEBOOK
-------------------
Nos vemos en FACEBOOK

Tuesday, December 4, 2012

DIY Spiked Blazer Tutorial

Hi dolls!
How you all doing? I hope you are doing great!
The first time I posted an outfit wearing this blazer I said I will share the steps of how I did this, so here they are. A promise is a promise ;) ! Time to spice that blazer up !! yaaay!!!

Español:
Hola bellezas!
Como les va? Espero que muy bien !
La primera vez que comparti un look vistiendo este blazer, dije que iba a compartir los pasos de como agregue estas tachuelas, asi es que aqui esta. Una promesa es una promesa ;)


You will need (Necesitaras)
-A blazer.
-Spikes. I got mine from Studs and Spike. I got these ones.  Pinche/ pua / clavo / como llames a las cabezita triangulares, abri el link para ver cuales use.
-Something sharp to make the holes. I used a dart. Algo filudo. Yo use un dardo de metal.
-A ruler. Una regla.
-A pencil to mark. Un lapiz para marcar.


1. Mark where you want the spikes to be like in the picture below.
Primero: Marca donde querras agregar las tachuelas, asi como se ve en la foto.


2. Make the hole. Be gentle and careful, you don't want to break the threads.
Para hacer la perforacion, hazlo con cuidado para que no tires los hilos de la tela.


3. Every spike has a screw. Turning the screw carefully from inside the blazer. 
Es hora de poner el tornillito que viene con la tachuela. Con cuidado pasa el tornillito como se ve en la primera foto. Despues que este dentro, usa un destornillador pequeño para asegurarlo como en la segunda foto.


This is how it looks outside of the blazer. You just have to place the spike and you're done.
Asi es como se ve el tornillito y ahora es tiempo de poner el pinche/pua/clavo/ como llames a la cabezita triangular. 


This is how the pattern of the spikes look on the shoulders of the blazer.
Asi es como se ve el diseño de las puas en el hombro de el blazer.


and voila!!
y listo !!


I hope you enjoy this tutorial. Maybe more DIY with spikes coming? ;) !
Quizas mas tutoriales de puas en los proximos dias? ;) !


Thank you so much for visiting!
 and Thank you so much for following :) !
warm regards!
Elsey 


Muchas gracias por visitar!
y muchas gracias por seguir este blog :) !
saludos!
Elsey

Monday, November 12, 2012

DIY Studded Denim Jacket / Chaqueta de tachuelas


Hi dolls! how was your weekend? I'm happy to share this DIY with you guys :) !

You'll need:

-A denim jacket. I got mine via ebay (J Crew).
-Studs. These are from  Studs and Spikes. They are 'Cones Standard English77-bag of 100 here.
-Pliers, a knife, etc (anything hard to bend the studs)


Español: Hola bellezas!! como fue tu fin de semana? 
Estoy alegre de compartir este proyecto Hazlo Tu Misma (DIY) con ustedes :) !
Necesitaras:
- Una chaqueta de jean. Yo compre la mia en ebay (marca J Crew).
- Tachuelas. Yo use estas.
- Un cuchillo (algo fuerte que usaras para doblar los dientes de las tachuelas)


First: Have a design. I preferred to place them on the back of my jacket. Originally I wanted to add them on the edge of the shoulders and part of the sleeves, but I thought that the idea would have worked better if the jacket was oversized. I did trace a straight line from one edge to the other and I calculated how many studs would go on it with almost an inch apart from each other. It was exactly 20 studs.

Primero: Ten un diseño. Yo preferi agregar las tachuelas a lo largo de la espalda. Originalmente, quise agregarlas en el borde de los hombros y una parte de las mangas, pero pense que esa idea se veria mejor en una chaqueta mas grande. Hice una linea y calcule como casi una pulgada entre tachuelas. Use 20 tachuelitas en la primera linea. Chequea la foto de abajo. 


Second: The way to place them. I opted for guiding myself by the lines of threading of the fabric, just like in the picture below. Once you are sure, push them down (they go through easily).

Segundo: Como veras en la foto de abajo, coloque los dientes a lo largo de las lineas del jean. Una vez que estas segura, presionalos hacia abajo (traspasaran la tela facilmente de esta manera).


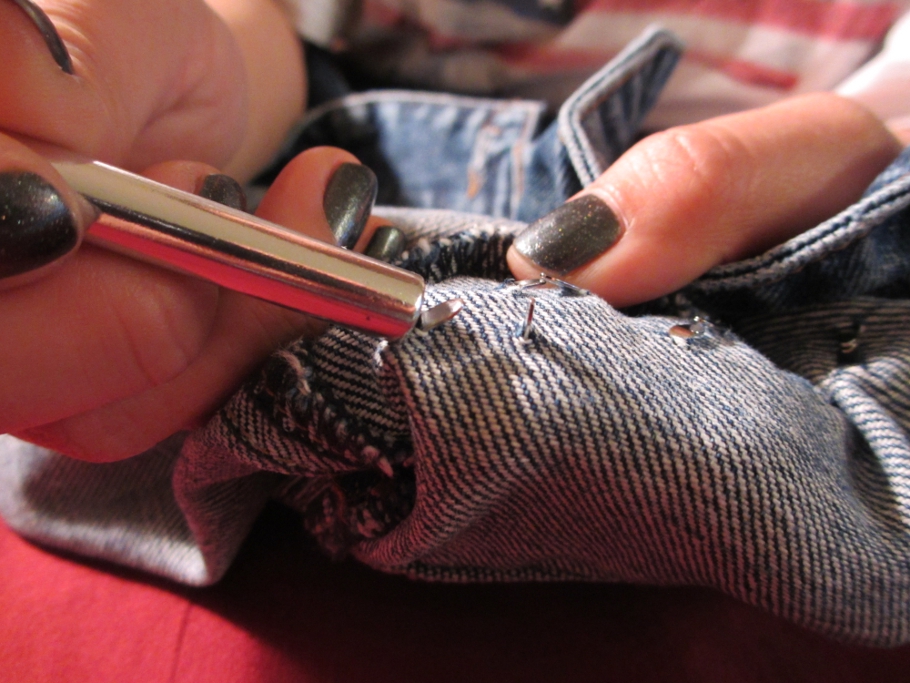
Third: Take something hard (I used the back of my exacto-knife) to bend the teeth of the studs. Make sure that they dont stick out or they will catch.

Tercero: Agarra o un cuchillo o algo duro para que dobles los dientes de las tachuelas (asi como hice yo en la foto). Asegurate que no sobresalgan ya que tu ropa se puede enganchar en ellas. 

and Voilà!! 

y listo!!!


ps: I used brass polish to clean to buttons up-they look shiner and more metallic.

pd: Use limpiador de metal 'Brasso Brilla Metal' para limpiar los botones - ahora se ven mas lindos. (producto Argentino. aqui).


I hope you like this idea. Have fun making your own DIY.

Thank you so much for visiting :) !
Have a great day and God bless you !

xoxo!!! 
Elsey 

Espero les haya gustado esta tutoria. Divertite haciendo tus manualidades.
Muchas gracias por visitarme :) !
Que tengas un lindo dia y que Dios te bendiga !
besitos!
Elsey

Tuesday, September 11, 2012

DIY Gold Highlighted Frame

I was looking for some gold frames to redecorate my love nest. I found a few nice ones in TJMax. I like the craft work of the wood (we know these are not handcrafted, but they have that vibe), but I still wanted to add something. In this case, I wanted to accentuate the highlights. 

What I Used:
  • A Frame.
  • Metallic Brilliant Gold Spray, Krylon brand. (I got it from Walmart)
  • A brush
  • And a paper plate

Spanish / Español :
Estuve buscando algunos cuadros dorados para re-decorar mi nidito de amor. Encontre unos muy lindos en la tienda de TJMax. Me encanto el trabajo en la madera ( sabemos que no son hechos a mano, de todas maneras tiene esa viba), pero quise agregar algunos toquesitos. En este caso, le agregue unos toques dorados para acentuar el relieve del diseño.

Lo Que Use:
  • Un cuadro.
  • Pintura metalica marca 'Krylon' (lo compre en Walmart)
  • Una brochita
  • Y un platito descartable de papel


Step 1:
Spray a small amount of the paint on the paper plate (only a little because it tends to dry out very fast)

Paso 1 
Rosea un poquito de pintura en el platito (solo un poco porque se seca rapido).


Step 2:
Quickly, using the hard brush give small touches to the places you want to highlight.
You repeat as much as you think is needed.

Paso 2
Rapido, con la brochita dale unos toques en los diseños a resaltar.
Podes repetir cuanto sea necesario basado en tu gusto.

And Voila!
You can translate this idea to other objects to pump them up.

Y listo! 
Podes usar esta idea para resaltar otros objetos que gustes.


I hope you like this quick DIY !
Thank you so much for visiting.
hugs!
Elsey


Espero te haya gustado este DIY (hazlo tu misma)
Muchas gracias por visitar.
abrazos!
Elsey

Saturday, August 25, 2012

DIY: Protect Your Jewelry / Protege Tus Joyas

 Hi dolls !
There are many ways to protect your jewelry. For those that are not made out of gold or sterling silver, you can store them in soft cloth bags or protect them with clear nail polish. Yes, nail polish! I learnt this trick in my art jewelry class. You know that many fashion jewelry pieces can turn dark or get scratched. Nail polish can protect their color.  As you can see on the piece above, the scratches on the piece are covered and smoothed by the application of a coat of clear polish.

Spanish/Español:
Hay varias maneras de proteger tus joyas. Para esas piezas que no son de oro o de plata, se puede guardar en bolsitas de tela de algodon o se pueden proteger usando esmalte de uñas. Asi es, esmalte de uñas! Aprendi este truquito en mi clase de arte de joyas. Tu sabes que muchas piezas de fantasia se vuelven negras o dejan color en tus dedos, a nadie les gusta eso, pero no te preocupes que el esmalte protegera que se vuelvan asi. 
Si compraste alguna joyas de fantasia y estan rayadas, podes aplicar el esmalte en ellas. Como veras en la foto de arriba, el antes y el despues.

On these pieces I applied a coat of clear polish to the metal portions, and in the case of the earrings I applied it to the stones.

Spanish/Español:
En estas piezas aplique el esmalte transparente en los metales, y en el caso de los aretes azules en las peidritas.


  • Turquoise ring from H&M $5.90 (last weekend) 
  • Olive stone ring: Jewelmint 'Midnight Soiree Ring' $11.99 (got it on sale) 
  • Stone Cold Ring (pink) $9.00 from Tobi
  • Blue Earrings from H&M a few dollars (I don't remember their price)

Thank you very much for reading,
hugs!!!

Muchas gracias por leer. 
abrazos!!!

Elsey


Friday, August 3, 2012

DIY Home Improvement and Nail Art.

Two ideas for this weekend. Nail art and home improvement. 

Dos ideas para este fin de semana. Arte en tus uñas y Mejorar tu hogar.


Here is a picture of the before and after of the chairs I'm improving. I used 'Bulldog hardware upholstery nails' from Walmart.
If this is your first time working on a project like this one, you have to have in mind that you might need an extra packet of nails for each chair. I say that because I bent many nails while hammering. This chair has 88 upholstery nails. There are 30 in each packet. I think this project is going to test our patience.

Spanish/Español:
Aqui les dejo una fotito de el antes y despues. Use 'Bulldog hardware upholstery nails' que compre en Walmart.
Si esta es tu primera vez trabajando en un projecto asi, tenes que tener presente que quizas necesites un paquete extra de estos clavitos. Digo esto porque mientras clavaba doble varios de estos clavos. Esta silla lleva 88 clavitos de decoracion. Cada paquete trae 30. Creo que este projecto testeara nuestra paciencia. 


Here is the picture and link of the upholstery nails I used.

Aqui esta la fotito de los clavitos de decoracion que use y el website. 


Nail art inspired by the flowers on my balcony. For the dots I used the tip of a hair clip. I made uneven lines for the leaves using a toothpick.

Spanish/Español:
Arte en mis uñitas inspiradas por las flores que tengo en mi balcon. Para hacer los lunares use la punta de un ganchito de pelo. Para el efecto de hojas use un palito de dientes.

Thank you so much for reading,
Have a great weekend.
hugs !!!
Elsey