
" To live a creative life, we must lose our fear of being wrong."
" Para vivir una vida creativa, debemos perder nuestro miedo de estar equivocados."
~ Joseph Chilton Pearce

Hi dolls, how are you? I hope you are enjoying your weekend. Days here have been nice, not cold enough to wear big coats or jackets jet. I had in mind to make a vest and here is one of them ;) I hope you like this DIY.
Hola bella, como has estado? Espero estes disfrutando de tu fin de semana. Por aqui, todabia no hace mucho frio como para vestir grandes abrigos, pero si como para vestir lindos chalecos ;) Espero te guste esta manualidad "Hazlo Tu Misma".

You'll need :: Necesitaras
- A Jacket. Una Chaqueta
- Studs (got it from Michael's). Tachuelitas (las compre de Michael's)
- Scissors. Tijeras
- Needle. Aguja
- Thread. Hilo
- Pins. Alfileres
- Shoulder pad (optional). Hombreras (opcional)
- A fabric pencil (something to mark). Un lapiz de tela o algo para marcar
- A dart or ice pick. Un dardo o Picahielo (algo filudo)

This is the Before (I decided to re-purpose this jacket since the arms were too tight - it was not flattering anymore)
Esto es el Antes (decidi re-inventar esta chaquetita ya que las mangas me quedaban un poco apretaditas - ya no me quedaba muy lindo)

1. Use pins to affix the front of the sleeve to the back so it doesn't move around while cutting the sleeves off.
Usa los alfileres para fijar la parte delantera de la manga y la parte de atraz asi la tela no se mueve cuando llegue el tiempo de cortar las mangas.

2. Cut just over an inch away from the sleeve line. (Through experience I've found that leaving to little makes it difficult to secure it with sewing when you fold it in later on)
Al cortar la manga, es mejor cortar mas de una pulgada de tela (es mejor tener mas tela para doblar que poquita). Con experiencia he notado que dejando poquita tela hace mas dificil para coser cuando llegue el tiempo de coser.

Coloca las tachuelas a lo largo de el tejido de la tela. Basado en mi diseño, las coloque en la parte de los hombros. (Coloque las tachuelas primero ya que despues agregaria las hombreras - paso 4)

Asi es como se ve despues de agregarlas en los hombros.

Asi es como se ve al revés con las patitas dobladas. Use alfileres para poner las hombreras y despues un par de cosidas para asegurar. El propósito de las hombreras es para cubrir las patitas de las tachuelas y para dar mas cuerpo a los hombros ya que este chaleco es de algodón.

A doblar la extra tela, usa los alfileres para asegurar.
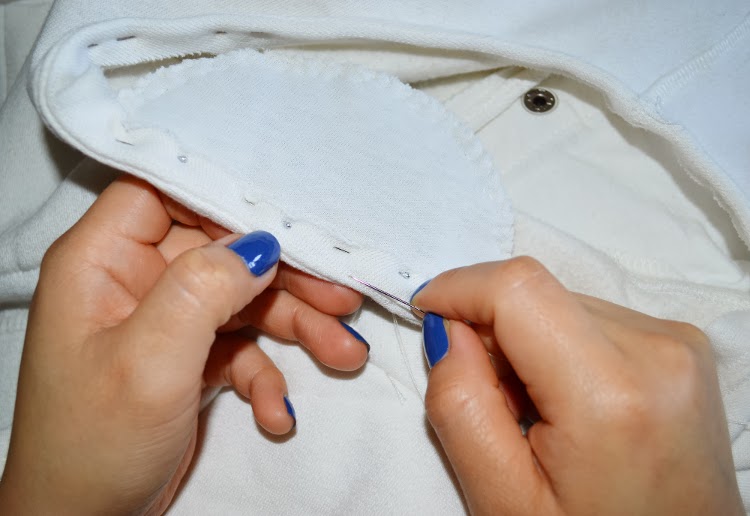
Despues de tenerlo asegurado con los alfileres, empieza a coser. (Yo lo cosi a mano ya que no tengo una máquina de coser -todabia ;) )

Después de hacer la primera parte. Ahora es tiempo de seguir la segunda. Usé un lápiz de tela para marcar puntitos donde iría las tachuelas.

Usa algo filudo para hacer los agujeros para las tachuelas. (Las solapas son mas gruesas que la parte de los hombros, es por eso que no se pudo perforar la tela usando sólo las tachuelas)

And voilà ! Here is the final vest when I finished.
And voilà ! Asi es como quedo el producto final.

See you on Facebook
Nos vemos en Facebook

Love it!
ReplyDeleteThe Fashion Heels
Facebook
Bloglovin
Thank you girl :) !!!
DeleteYour are brilliantly creative! This vest looks amazing hun! May your week get off to a great start!
ReplyDeleteaw! Sam, thank you so much and I'm so happy you like it :) !!!
Deletexo
WOW!! You are so talent! Love it!
ReplyDeleteKisses
thank you so much! I'm happy you like it :D
DeleteXO !
Wow me encanta esta idea!!! gracias por tu comentario!!
ReplyDeleteMe gusta tu blog! quieres que seamos seguidoras?
Besos, desde España, Marcela♥
Hola Marcela, muchas gracias :D ! que bueno que te gusto. Y claro que si, me encanta tu idea :)
Deletebesotes !
Wow! Such a great idea. Thx for sharing. Would you like to follow each other on GFC? Let me know.
ReplyDeletexo
Lenya
www.fashiondreamsandlifestyle.blogspot.com/
Thank you so much Lenya :D ! I'm so happy you like it :D
DeleteXO !
Thanks for leaving such a darling comment on my blog!
ReplyDeleteI really like your idea here, the studs are so cool!
Have a great day,
-Kati
aw Kati! thanks for your support :) ! So glad you like this
Deletexo !
great diy girl!
ReplyDeleteXX
WWW.AROUNDLUCIA.COM
WWW.AROUNDLUCIA.COM
Thank you so much Lucia :D !!!
DeleteXO
Absolutely amazing!
ReplyDelete<3 this.
Thank you so much :D !
DeleteXO !